Make your own… frozen gluten free pizza with GF Jules!
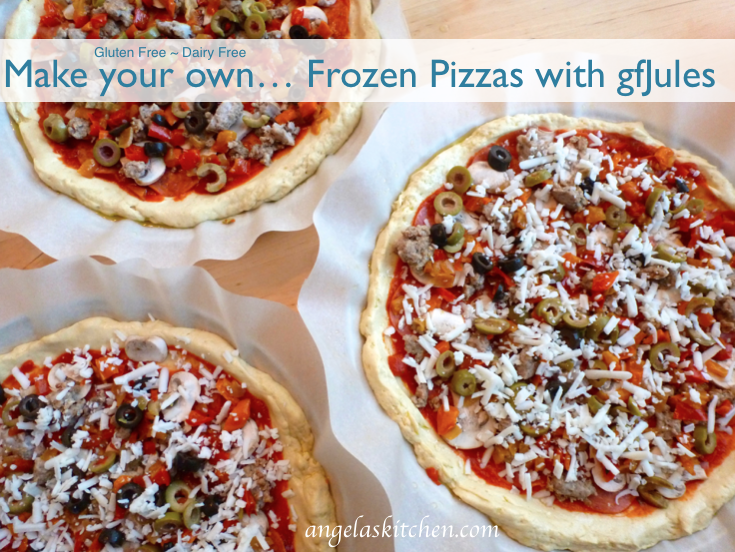
When I want a quick pizza on a busy night, or the convenience of being able to simply pop one in after a long, hard day store-bought frozen pizzas are all well and good for a quick last minute meal. And while there is finally some gluten free (and one or two gluten AND dairy free) options out there, I prefer to get my convenience food a bit closer to home. Well, actually IN my home by making my own ready to eat frozen pizzas. Homemade pizza can’t be beat for flavor, variety or cost.
I like to get the whole family involved when I can if we are making extra things to put in the freezer, and let me tell ya, pizza is the perfect meal to pull everyone in to help! Kids of almost any age can top the crusts, and older kids can help cook toppings, chop and mix up the dough. It’s a lot of fun to set aside an hour or so on the weekend to hang out with the family and have tasty pizza waiting in the freezer at the end. When making freezer pizzas with the kids, however, I always bake one of our creations for dinner that night. Nothing like the savory reward of a job well done! YUM!

To make this batch of pizzas extra easy and delicious, I used the Value Box of gfJules Gluten Free Pizza Crust Mix. The value box makes eight pizzas (yeast packets are included), are dairy free, certified kosher and certified gluten free. And the pizza it makes is delicious. My youngest daughter kept sneaking my crust ends on my pizza when I wasn’t looking because it was so good. Little stinker! Using the mixes are a great way to dip your fingers into gluten free baking as gfJules has made it so easy for you. Simply mix the crust mix with the yeast, and a couple other ingredients you already have at home and pat out, top and bake. Easy as that!
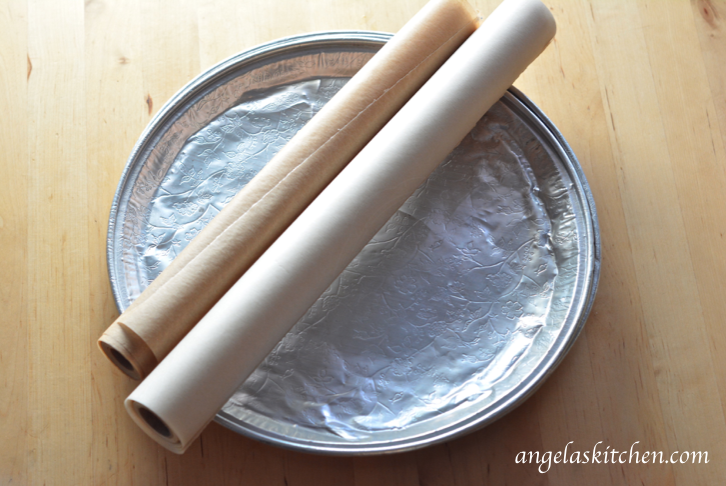
Before making your frozen pizzas, start by assembling your sauce, cheese (or in our case, dairy free cheese replacement), and toppings. To support the pizza crusts while frozen, I use cheap catering trays I got at a local party supply store a few years ago. I don’t bake on them, but they do support the crust (so no broken crusts in the freezer), and after washing, I have reused them for several years now. I got them for about $4 dollars for a package of 5 around ten years ago. Also have on hand baking parchment and olive oil. Cut circles of parchment about 2 inches larger than the catering trays. Lightly oil the trays, just enough for the parchment to stick. Place circles of parchment on each tray. Lightly oil parchment and set trays aside. I place my prepared trays on my dining table with the pizza toppings and olive oil.
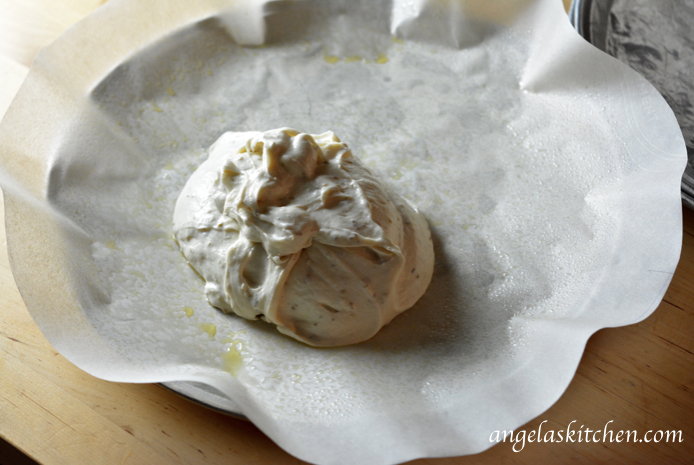
Now it’s time for the crust! I mix together four of the gfJules pizza crusts at a time, not the entire eight mixes. I do this as it is important to be able to work with the crusts very quickly, patting them out and topping them before they begin to rise. The first couple times you work with gluten free crusts, try only making two pizzas at a time until you get the technique down. Your pizza will thank you!
Another tip on making bulk pizza: you don’t have to add all the yeast packets. Yep, that is right, save the extras for another baking project. Part of the joy of baking yeast is that is expands. I have found that when mixing up the 4 packages of gfJules crust mix, I only need to add ONE packet of yeast. I do this for all my yeast bread baking. For example, when doubling gluten free yeast breads, I never need to double the yeast. Trust the yeast to do that on it’s own. Trust me, that yeast will grow…
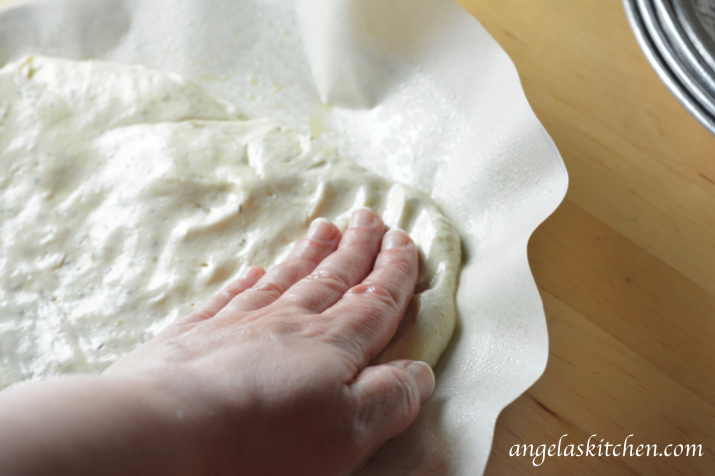
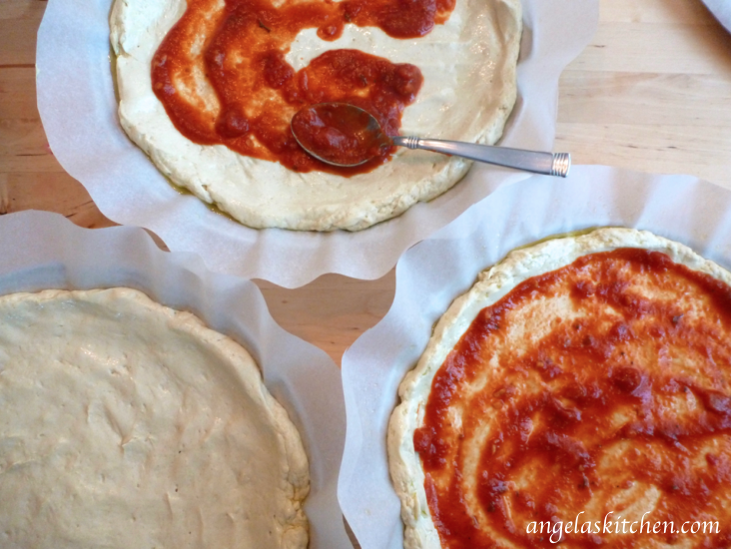
After mixing up the 4 pizza crusts, divide the dough between four of your prepared pizza trays. Drizzle each with a bit of olive oil. Using well oiled hands, pat out the dough, creating a ridge around the edge to contain your pizza toppings.
Nice! Only thee more to go!

After the four pizzas are patted out, top each with sauce…
…and your chosen toppings. The really wonderful thing about making frozen pizzas for my family is that I can add the dairy free cheese right away. I do like the dairy free cheese alternatives, and they are a god-send for my dairy allergic family, BUT the problem with them is that they can over cook very quickly. I when I make pizzas, I usually bake them off without the cheese substitute. AFTER baking, I top our pizza with the cheese sub, then pop the pizza back into the turned off (but still hot) oven and wait for the cheese substitute to melt. With a frozen pizza, you don’t need to do that! Simply top with your favorite toppings and the diary free cheese. Baking from frozen keeps the cheese substitute from over cooking, saving me an extra step later. Gotta love that!
 After topping, wrap each pizza in heavy duty freezer plastic and put into the coldest part of your freezer. If at any time while topping you notice the crust has started to rise a bit, feel free to put it into the freezer until you can get around to topping that pizza. The cold will slow down the action of the yeast.
I label all my pizzas after wrapping them with the type of pizza, the date they were made and cooking instructions. Yep, you can probably tell it is a pizza, but all the flavors look alike once frozen and it is nice to know what types you have in the freezer and when they were made. I don’t keep frozen pizza longer than 2 to 3 months.
To bake your pizza from frozen: The key to baking frozen pizza and having it turn out great is to place your pizza in a cold oven. Yep, you heard me… a COLD oven. No preheating for you! This gives the pizza a chance to thaw and rise while baking, giving it that just made texture and taste you are looking for. YUM!

The Recipe: Make your own… frozen gluten free pizza with GF Jules!
Ingredients
- Value box of 8 gfJules pizza crusts
- ingredients for pizza crusts, for each crust: 1/2 cup water, 2 egg whites, 2 tablespoons olive oil, 1/2 teaspoon cider vinegar
- pizza sauce for 8 pizzas
- favorite pizza topping for 8 pizzas
- cheese or dairy free cheese substitute for 8 pizzas
- 8 catering trays
- baking parchment
- heavy duty plastic freezer wrap
Instructions
- Cut 8 parchment circles 2 inches larger than the catering trays. Lightly oil trays so parchment sticks, put parchment circles on trays, then oil parchment. Set aside.
- Working with only 4 crusts at a time, mix together 4 crusts according to the package directions. Divide pizza crust between 4 prepared trays. Drizzle a bit of olive oil over each crust. With well oiled hands, pat out pizza crusts, leaving a rigid at edge to contain toppings.
- Spread pizza sauce onto each crust. Add toppings.
- Wrap each pizza well, label and freeze. Repeat with remaining pizza crusts and toppings.
- To bake: nwrap pizzas and remove from catering tray. Place pizza (still on parchment) on your favorite pizza baking pan, pizza stone or directly on the baking rack of the cold oven. Close oven door. Set oven to bake at 400 degrees F. Check pizza after 25 minutes. Depending on toppings, bake for another 15 to 20 minutes until crust is baked through and toppings and bubbly and cheese is melted. Enjoy!
I received pizza crusts from gfJules to make the above pizzas, but all words and opinions are my own. Posts may contain affiliate links.
Thank you so much for perfecting the frozen pizza method, Angela!! I’ve been parbaking my homemade pizzas for years, but I can’t wait to try this method instead.
Thank you!!!
~jules