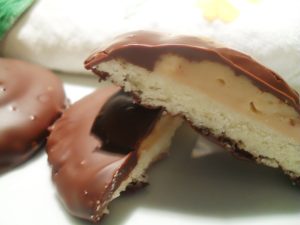
Gluten & Dairy Free Girl Scout Cookie Makeover – Tagalongs
Part four of my gluten and dairy free Girl Scout Cookie makeover! To see part one (Do-Si-Dos) and to read my take on why I think the Girl Scouts need to develop a gluten free/allergen free cookie, head over to this post. Part two featured Thin Mints, and part three featured Trefoils. In our house, we would also love the Girl Scouts with allergies to actually be selling a product that is safe for them. Contact the Girl Scouts here to encourage them to make a gluten free allergen free cookie. Thanks!
For the gluten and dairy free version of the tagalongs, I started with the dough from the Trefoils as the base. I’ll be using the same dough when I post Samoas next week. It’s a crisp, yummy shortbread that works well for both cookies. The filling is what I use when I make a homemade version of a peanut butter cup. Mmm… For chocolate, I used a gluten and dairy free semi-sweet chocolate as I think the dark would be a bit heavy for this, overwhelming the peanut butter flavor. Use dark chocolate for Thin Mints, or just go ahead and use dark for this if it is what you have on hand.
Gluten & Dairy Free Tagalongs
One batch of gluten and dairy free Trefoil dough, chilled overnight
Peanut butter filling:
1 1/2 cups creamy no-stir style natural peanut butter (or crunchy if that’s how you roll)
3/4 cup powdered sugar, sifted
1/2 teaspoon gluten free vanilla
1/4 teaspoon salt
Coating:
12 ounces gluten and dairy free semi-sweet chocolate chips
1 Tablespoon organic palm shortening (unless you want to temper your chocolate, then skip it)
Roll out chilled dough on plastic wrap to 1/4″ thick. Cut out cookies using a circular 1 1/2″ cookie cuter. Alternatively, you can take 2 teaspoons of dough and roll into a ball. Flatten with a glass to 1/4″ thick. Bake cookies in a preheated 350 F degree oven for 7 to 8 minutes. Allow to cool.
For filling: Mix filling ingredients in a small sauce pan over medium-low heat. Stir constantly, not allowing filling to scorch. This does not need to get too hot, just warm enough for all the ingredients to blend well. While still warm to the touch (but not too hot) put filling into a heavy plastic freezer bag. Seal. Snip a corner of the bag. Pipe about 1 to 1 1/2 teaspoons of filling onto the center of the cooled cookie base. Smooth if needed. Chill cookies in the refrigerator 15 to 20 minutes until peanut butter is cooled and firmer.
Melt chocolate and 1 Tablespoon shortening in a dry pan on the stove (stir constantly) or a bowl in the microwave. Be sure to not let any water or moisture touch the chocolate as it will seize and ruin the chocolate. When chocolate is mostly melted, but there is a few pieces left, remove from heat. Stir chocolate more until all is incorporated into the chocolate and it is very smooth.
Balance a cooled cookie on a fork. Lower cookie into chocolate, covering all surfaces. Tap excess chocolate off cookie back into bowl. Place cookie on a cooling rack covered in plastic wrap or parchment. Allow chocolate to set. Chilling the cookies will speed the chocolate setting up.


MMMMMMMMMMM,…what tasty & fab looking cookies! I love them!
Congrats on your new blog!! Looks great!
Many greets from a gf foodie from Brussels, Belgium!!!
Pingback: Tweets that mention Gluten & Dairy Free Girl Scout Cookie Makeover – Tagalongs | Angela's Kitchen -- Topsy.com
Pingback: Gluten & Dairy Free Girl Scout Cookie Makeover – Samoas | Angela's Kitchen
Finally got to try these this weekend. They were absolutely wonderful! A little time-consuming, but worth it. I didn’t need as much peanut butter filling, but I did have to melt more chocolate for coating. My chocolate must have been thicker. Or, maybe I rolled the cookies out thinner. I ended up with almost 6 dozen cookies! And surprisingly, there aren’t a whole lot left. 😉
Pingback: Weekly Gluten-Free Menu Plan & Cakes