Pizza Crust, Gluten & Dairy Free – October 2008 Daring Baker Challenge
This challenge was a nice one. I had already figured out a gluten and dairy free crust that my family really likes, but this one makes a good crust that is egg free and one you can freeze the unbaked dough. Nice!
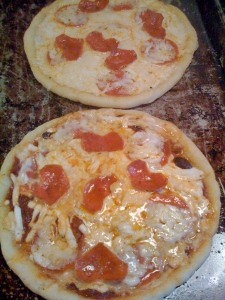
I didn’t get too creative on the toppings. I have kids and one will only eat “cheese” (cashew cheese sauce) and pepperoni on her pizza, NO tomato sauce or anything else. Everyone else like lots of toppings, from roasted peppers, mushrooms, artichokes, spinach, etc. Really anything you can put on a pizza. (Except my husband, who thinks Canadian bacon and pineapple pizza is an abomination. I wonder where my picky daughter gets it from?) We had a wedding to attend and the girls were sitting at the kid table that had pizza. Using one of the 6 crusts, I divided the dough in half and made two individual pizzas with pepperoni that I had cut into heart shapes. That was as fancy as I got this time.
I will be making this again. The only thing I changed from the gluten free version of the recipe (thank you for adapting it for us GF bakers Gluten a go go!) was that I used millet in place of certified gluten free oat flour. There isn’t as much GF oats available in my area right now, and they are a bit out of budget. However, I do have a ton of millet flour at the house. This turned out to be a good way to use it. Also, because I have a pretty hefty family of BIG eaters, the crust was a little on the skimpy size for them, and too thin. Remember, though I have a triathalon freek husband and two kids starting puberty in the house, so food-wise they eat A LOT! I will be freezing the dough by dividing into 3 portions, not 6 so that the crust is slightly thicker and much bigger around for my pizza vultures.

Thank you for this challenge, Bakers! This month was hosted by Rosa’s Yummy Yums. She was originally to host with two other bloggers, but one has opted out of Daring Baker’s for now and Sherry of What Did You Eat passed away just a short time before.
Of picking the recipe, Rosa said, “As you all know by now, Sherry passed away tragically on the 20th of July 2008 after having been struck by a massive heart-attack. Glenna, on her side, has decided to quit The Daring Baker’s and to stop her baking adventure for personal reasons. So that’s why I am all alone on that challenge. Prior to her sudden death (9 days before), Sher had shared with me her recipe idea for the October challenge that she, Glenna and myself should have hosted together. When she died, it was clear for me that I would respect her choice and that I would still submit her recipe. This is my last ode to a very appreciated blogger, DB member, skilled baker and cook whom I miss a lot!
Thanks to Sheltie Girl (Natalia) at http://www.glutenagogo.blogspot.com (USA) for her precious help and for giving me a glute-free version of this recipe!!!”
***************
THE CHALLENGE: You have to use the tossing method (as explained below) for at least 2 Pizza Crusts. If you are not comfortable with it, then you can switch to the rolling method, but you HAVE to try the traditional method and exercise it, using at least two dough pieces. You should also capture the moment by either filming or photographing yourself while tossing the dough.
THE RULES: This month’s recipe leaves you with much freedom! You can either make the Pizza Dough gluten-free or the normal way. You may use the sauce (anything liquidy, saucy and spreadable like cream cheese, flavored oils, pesto, Nutella, Peanut Butter, pumpkin puree, etc…) and toppings of your choice, may they be savory or sweet, gluten-free, vegan, vegetarian or non-vegan/vegetarian. You must use BOTH (sauce & toppings).
JUST USE YOUR IMAGINATION!!!
POSTING DATE: Wednesday, October the 29th 2008
EQUIPMENT: Stand mixer with paddle and dough hook attachments (optional, see recipe), cooking thermometer, baking sheet, parchment paper, cooking oil, plastic wrap, pizza peel/scraper, pizza stone or pan.
RECIPE SOURCE: “The Bread Baker’s Apprentice: Mastering The Art of Extraordinary Bread” by Peter Reinhart. Ten Speed Press, Berkeley, CA. Copyright 2001. ISBN-10: 1-58008-268-8, ISBN-13: 978-158008-268-6.
***************
~ BASIC PIZZA DOUGH ~
Original recipe taken from “The Bread Baker’s Apprentice” by Peter Reinhart.
Makes 6 pizza crusts (about 9-12 inches/23-30 cm in diameter). (or 12 personal sized crusts and 3 large crusts for MY family!)
Ingredients:
4 ½ cups GF Flour Blend with xanthan gum or 1 cup brown rice flour, 1 cup corn flour, 1 cup oat flour (I used millet flour), 1 ½ cup arrowroot, potato or tapioca starch + 2 tsp xanthan or guar gum
1 3/4 Tsp Salt
2 tsp Instant yeast
1/4 Cup (2 ounces/60g) Olive oil or vegetable oil (both optional, but it’s better with)
1 3/4 Cups (14 ounces/420g or 420ml) Water, ice cold (40° F/4.5° C)
1 Tb sugar (or use agave syrup)
cornmeal for dusting
DAY ONE
Method:
1. Mix together the flour, salt and instant yeast in a big bowl (or in the bowl of your stand mixer).
2. Add the oil, sugar or agave syrup and cold water, then mix well (with the help of a large wooden spoon or with the paddle attachment, on low speed) in order to form a sticky ball of dough.
3. Flour a work surface or counter. Line a jelly pan with baking paper/parchment. Lightly oil the paper.
4. With the help of a metal or plastic dough scraper, cut the dough into 6 equal pieces (or larger if you want to make larger pizzas).
NOTE: To avoid the dough from sticking to the scraper, dip the scraper into water between cuts.
5. Sprinkle some flour over the dough. Make sure your hands are dry and then flour them. Gently round each piece into a ball.
NOTE: If the dough sticks to your hands, then dip your hands into the flour again.
6. Transfer the dough balls to the lined jelly pan and mist them generously with spray oil. Slip the pan into plastic bag or enclose in plastic food wrap.
7. Put the pan into the refrigerator and let the dough rest overnight or for up to thee days.
NOTE: You can store the dough balls in a zippered freezer bag if you want to save some of the dough for any future baking. In that case, pour some oil(a few tablespooons only) in a medium bowl and dip each dough ball into the oil, so that it is completely covered in oil. Then put each ball into a separate bag. Store the bags in the freezer for no longer than 3 months. The day before you plan to make pizza, remember to transfer the dough balls from the freezer to the refrigerator.
DAY TWO
8. On the day you plan to eat pizza, exactly 2 hours before you make it, remove the number of desired dough balls from the refrigerator. Place on a sheet of parchment paper and sprinkle with a gluten free flour. Delicately press the dough into disks about ½ inch/1.3 cm thick and 5 inches/12.7 cm in diameter. Sprinkle the dough with flour, mist it again with spray oil. Lightly cover the dough round with a sheet of parchment paper and allow to rest for 2 hours.
9. At least 45 minutes before making the pizza, place a baking stone on the lower third of the oven. Preheat the oven as hot as possible (500° F/260° C).
NOTE: If you do not have a baking stone, then use the back of a jelly pan. Do not preheat the pan.
10. Generously sprinkle the back of a jelly pan with cornmeal. (I oiled my pan instead) Press the dough into the shape you want (about 9-12 inches/23-30 cm in diameter – for a 6 ounces/180g piece of dough) on oiled jelly roll or parchment paper.
11. Lightly top it with sweet or savory toppings of your choice.
12. Place the garnished pizza on the parchment paper onto the stone in the oven or bake directly on the jelly pan. Close the door and bake for about 5-8 minutes.
NOTE: Remember that the best pizzas are topped not too generously. No more than 3 or 4 toppings (including sauce and gfcf cheese) are sufficient.
13. Slide the garnished pizza onto the stone in the oven or bake directly on the jelly pan. Close the door and bake for abour 5-8 minutes.
NOTE: After 2 minutes baking, take a peek. For an even baking, rotate 180°.
If the top gets done before the bottom, you will need to move the stone or jelly pane to a lower shelf before the next round. On the contrary, if the bottom crisps before the ‘cheese’ caramelizes, then you will need to raise the stone or jelly.
14. Take the pizza out of the oven and transfer it to a cutting board or your plate. In order to allow the cheese to set a little, wait 3-5 minutes before slicing or serving.


Great job, especially making it gluten-free, I’m impressed! 🙂
Great looking pizza! Yum!
Pingback: Menu Plan Monday - 11/17/08 « Angela’s Kitchen
Pingback: Gluten Free-zer Friday – February 2010 Once a Month Mom Gluten & Dairy Free Dinner Adaptions « Angela’s Kitchen