• Skip to primary navigation
  • Skip to main content
  • Skip to primary sidebar
  • Skip to footer

Angela's Kitchen

Cooking gluten and diary free... because everyone deserves a cookie!

  • Email
  • Facebook
  • Google+
  • Instagram
  • Pinterest
  • Twitter
  • About Me
    • Privacy Policy & Disclaimer
      • What’s the deal with donating to Angela’s Kitchen?
    • Nutritional Information
  • Recipes
    • Have other allergies?
      • Corn Free Recipes
      • Egg Free Recipes
      • Fish Free Recipes
      • Peanut Free Recipes
      • Pork Free Recipes
      • Shellfish Free Recipes
      • Soy Free Recipes
      • Tree Nut Free
    • Beef & Bison
    • Beverages
    • Breads & Pizzas
    • Camp, Camping & Traveling
    • Chicken & Turkey
    • Craft items not usually Gluten Free
    • Deserts, Candy, Treats & Snacks
      • Cake & Cookie Decorating Ideas
    • Dining Out & Bakeries
    • Dips, Sauces, Spice Mixes, Spreads, Dressings & Gravies
    • Eggs
    • Flours & Ingredients for Gluten Free & Dairy Free Cooking
    • Grain Free & Paleo Friendly
    • Grains, Legumes & Pasta
    • Holiday Fun!
    • Pork
    • Product Information & Reviews
    • Seafood
    • Vegetarian and Vegan Recipes
    • Veggies & Fruit
  • Menu Plans
    • Gluten Free Menu Swap
  • Slow Cooker
  • Freezer Cooking
  • Food Preserving
  • Extras
    • Books, Ebooks & Classes
    • GF/GFCF Resources & Links
      • GF & GFCF Blogs and Links
      • GF Medications
      • Minnesota Celiac Support Groups
      • Twin Cities Gluten Free Dining List
    • Handmade stuff I love
    • Oh, the places I go…

Crackers & Flat Breads

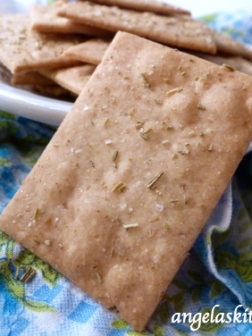
Anti-Wheat Thin Cracker, Gluten Free/Dairy Free – WonderMill Challenge

January 30, 2013 by angelaskitchen Leave a Comment

For week three of  ”So, what’s a girl to do when she finally gets her hands on a WonderMill?” WonderMill Challenge, I baked up  these lovely Gluten Free Dairy Free Crackers we call the Anti-Wheat Thin.   Oh, yes, I did!  And these, my dears, are awesome.  You need to make them now.  They are easy-peasy (even when grinding your own grain), pull together fast (mix it up in FIVE minutes – even when grinding your own grain), and are delicious.  And did I mention easy?  Yeah – they are.  Head on over to GrainMillWagon.com and say “Hi!”

Then bake up a batch to nibble on during that big game this weekend everyone is talking about.

          *          *           *            *          *

I had all the intention to make a completely different cracker for the WonderMill Challenge.  But, as you all know can happen, life sometimes changes the best laid plans.  In this case I am so glad it did!

A few weeks ago my son came down with a cold.  Not just any cold.  A nasty, yucky head cold that we dubbed the “Bubonic Plague for Modern Times.”  He even missed a couple days of school.  He is 17 now and I don’t think that has happened since he was nine years-old.  When he finally pulled himself together enough to stagger to the store, he craved a little comfort nibbles and picked up Wheat Thins.

My son (unlike most of the family) doesn’t have celiac, so yeah, he could indulge.  However, I am still a bit of a whole food mamma and wanted him to have a different option for his snack cravings.  Honestly, I also didn’t want gluten crumbs all over my couch. That meant blending up a gluten free dairy free cracker to replace his boxed up snack.  Fortunately, these crackers are so easy, even a 17 year-old boy can whip them up in no time even with a sniffle.  The dough takes all of 5 minutes to make, even while grinding up your own flour, and 15 more minutes to bake.  That is less time than it takes to get to the store and back, and you can stay in your jammies.  Take that, prepackaged crackers!  My son LOVED these and calls them the Anti-Wheat Thin.  That, my dears, is a win.

These are wonderful on their own, but would pair really well with a dip this coming weekend if you are watching the big game.  Enjoy!

Gluten Free Dairy Free Crackers – The Anti-Wheat Thin

Author: Angela Litzinger @ angelaskitchen.com
Recipe type: gluten free, dairy free, gfcf, cracker, vegan
Serves: makes about 4 dozen 1½” crackers

If you want to keep these all whole grain, skip the additional starches and decrease water slightly. I was trying to make these as similar to my son’s cracker without compromising the whole food recipe I was going for.

⅓ cup freshly ground sorghum flour (pastry setting)
⅓ cup brown rice flour (pastry setting)
1½ tablespoon potato starch (optional)
1½ tablespoon corn starch or arrowroot powder (optional)
2 tablespoons freshly ground flaxseed
1 tablespoon packed brown sugar
½ teaspoon salt, plus more for sprinkling
2 tablespoons solid coconut oil
4 to 5 tablespoons cold water
1 teaspoon crushed dried rosemary

Preheat oven to 400 degrees F.

Combine sorghum flour, rice flour, starches (if using), flaxseed, brown sugar, and the ½ teaspoon salt. Whisk well. Using a pastry cutter, two forks or the whisk, cut the coconut oil into the dry ingredients until evenly distributed and it looks like wet sand, with no large pieces of coconut oil remaining.

Add 3 tablespoons of the cold water and mix. While still mixing, add as much of the remaining water needed one tablespoon at a time just until the dough pulls together and is workable. Roll the dough into a smooth ball.
On a silpat or parchment, roll out dough very thinly. I had a one inch boarder around the dough to the edge of the pan, so the dough was very thin. Sprinkle dough with rosemary and desired amount of salt.

Using a pizza cutter, cut desired shape into dough. Transfer the silpat or parchment paper to baking sheet.

Bake at 400 degrees F 13 to 15 minutes (depending on thickness) or until browned along the edges and crisp. Transfer crackers to a cooling rack.

Filed Under: Breads, Crackers & Flat Breads, Dairy Free, Desserts & Treats, GFCF, Gluten Free, Grains & Legumes, Product Reveiw, Products & Reviews

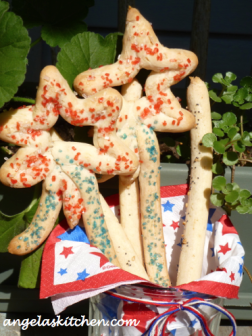
Gluten & Dairy Free Crisp Bread Sticks (and bread stick “sparklers”) – Gluten Free Ratio Rally

July 4, 2012 by angelaskitchen 12 Comments


I am SO very excited to be part of the Gluten Free Ratio Rally!   Each month the group posts recipes based on a specific food (normally made with gluten but changed to gluten free) that they have created by starting with a ratio.  Some use the same proportions (taken from Michael Ruhlman’s book Ratio), but you also have the freedom to create new ones based on your preferences. The goal is to remove the mystique from baking and inspire a sense of ability and adventure.  That is my kind of fun!…

Read More

Filed Under: Breads, Crackers & Flat Breads, Dairy Free, GFCF, Gluten Free, Yeast Bread

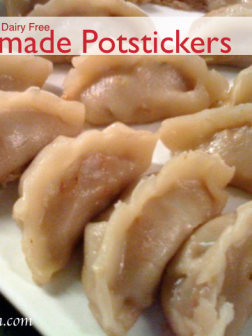
Chinese dumplings/potstickers – June 2009 Daring Kitchen Challenge

June 14, 2009 by angelaskitchen 11 Comments

Gluten Free Dairy Free Homemade Potstickers1

This month’s challenge is a family recipe from Jen of Use Real Butter.  It is one of the things I used to LOVE back in the ol’gluten filled days – potstickers!  I made a dough last year for mu shu wraps that at the time I thought I would try as a potsticker wrap, but, you know how it goes, I got busy and never quite got to it.  So, here we are, a year later, and it took the amazing Daring Cooks to get me to remember and try it.  Thanks guys!  I am so glad I did.  The fillings used were very tasty.  Jen is one lucky girl having grown up on these every weekend!

This does take a bit of time to put together (think roll, fill, fold and pinch – over and over and over and over…), but I think the results are worth it.  I have missed these.  I am putting these up in the freezer for Mommy treats (okay, I’ll share…) and for guests and just to have on hand.  I will put the freezing instructions and some other filling options on the blog Friday for Gluten Free-zer Friday, so stay tuned!The Kitchen at 200 x 170 (largest)

The Challenge: Chinese dumplings/potstickers (aka gyoza in Japanese)

Challenge by Jen of Use Real Butter (family recipe) adapted to gluten free by me

Jen says:  “It’s a basic concept: a filling inside a dough wrapper, sealed, and cooked. This delicious theme runs through many cultures and is among the more popular bites at Chinese restaurants – especially dim sum. The recipe I provide is based on my family recipe. There is a lot of wiggle room and I encourage you to explore. If you’ve made them before – great! Now try something different!”

Gluten Free Potsticker Wrappers (same as the Mu Shu Wraps) by Angela Litzinger

Made a few more than 2 dozen…  You will need to double this to have enough dough for the filling.

1 cup finely ground rice flour

1/4 cup sweet rice flour

1 1/4 cups water

1/2 – 1 cup tapioca flour/starch

Place rice and sweet rice flour in a pan.  While mixing, add water.  Cook over medium heat, stirring constantly until flour is cooked and very, very sticky.  Remove from heat.  Place sticky dough into a mixing bowl.  Add 1/2 cup tapioca flour to bowl and mix with paddle attachment of your mixer.  Allow dough to cool.  When cool, remix.  If dough is too sticky to handle, sprinkle dough with 2 – 3  tablespoons of tapioca flour at a time and mix (this will depend on the humidity in your area).  When you have a dough you can pull off pieces and not have stick to your hands (think play dough consistency – Yum), it is ready.

Roll slightly smaller than walnut sized pieces of dough, flatten into a disk, place on lightly “floured” (use tapioca flour/starch) plastic wrap, roll out dough with a rolling pin, rotating dough/flipping dough over so that wrap is evenly rolled out, using plastic wrap if needed to help pick up dough.  I made 3 1/2 – 4” rounds.

About this size for the dough…

Look how thin this rolls out even though it is a gluten free!  Woo!

Check Jen’s post on how to fill and shape the dumplings.  I wet the edge of the round with a bit of water to get the edges to stick if the pleating wasn’t sticking, but the dough mostly stuck to itself.  Remember that gluten free dough is a bit fragile, so you be gentle to your dough.  Any rips and tears I had were pretty easy to put back together, however.  I did have to place the dumpling dough with the filling on a tray, then pleat, instead of pleating in my hands as the dough couldn’t take too much rough handling…

Gluten Free Homemade Potstickers3 Dairy Free

Dumplings ready for cooking.


To boil: Bring a large pot of water to a boil and add dumplings to pot. Boil the dumplings until they float.

To steam: Place dumplings on a single layer of napa cabbage leaves or on a well-greased surface in a steamer basket with lid. Steam covered for about 6 minutes.

To pan fry (potstickers): Place dumplings in a frying pan with 2-3 tbsp of vegetable oil. Heat on high and fry for a few minutes until bottoms are golden. Add 1/2 cup water and cover. Cook until the water has boiled away and then uncover and reduce heat to medium or medium low. Let the dumplings cook for another 2 minutes then remove from heat and serve.

Gluten Free Dairy Free Homemade Potstickers2

My tasty potstickers.Gluten Free Homemade Potsticker Dairy Free4

(Sorry about the photo quality.  Iphones are great, but maybe not for food photos…)

Jen’s Family Potsticker Fillings:

pork filling:
1 lb (450g) ground pork (I used ground turkey – do NOT use low fat ground turkey- because that is what I had, but will use pork next time)
4 large napa cabbage leaves, minced
3 stalks green onions, minced
7 shitake mushrooms, minced (if dried – rehydrated and rinsed carefully)
1/2 cup (75g) bamboo shoots, minced
1/4 (55g) cup ginger root, minced
3 tbsp (40g) soy sauce (use a gluten free one!)
2 tbsp (28g) sesame oil (I used toasted sesame oil)
2 tbsp (16g) corn starch

I also added 2 cloves minced garlic, because I’m crazy like that…

OR

shrimp filling:
1/2 lb (225g) raw shrimp, peeled, deveined, and coarsely chopped
1/2 lb (225g) ground pork
3 stalks green onions, minced
1/4 cup (55g) ginger root, minced
1 cup (142g) water chestnuts, minced
1 tsp (5g) salt
3 tbsp (40g) sesame oil
2 tbsp (16g) corn starch

Combine all filling ingredients in a large mixing bowl and mix thoroughly (I mix by clean hand). Cover and refrigerate until ready to use (up to a day, but preferably within an hour or two).

dipping sauce:

2 parts soy sauce (use a gluten free one)
1 part vinegar (red wine or black)
a few drops of sesame oil (again, I like the toasted sesame oil)
chili garlic paste (optional) (use a gluten free one)
minced ginger (optional)
minced garlic (optional)
minced green onion (optional)
sugar (optional)

Thank you,  Jen, for this challenge.  It has inspired me and brought back an old friend to my dinning table!  I will be making, and freezing these with various fillings to enjoy whenever the mood strikes…  Knowing myself, that mood should be very often!


I’m walking 60 miles in the Breast Cancer 3-day!  Will you help me reach my goal?

Filed Under: Crackers & Flat Breads, Dairy Free, Daring Baker Challange, Dips and Sauces, GFCF, Gluten Free, Pork, Seafood

Gluten Free Lefse

December 15, 2008 by angelaskitchen

Gluten Free Dairy Free Lefse

This is how we made lefse this weekend.  It tasted like I remember and the kids really liked it.  I do not have any traditional lefse making tools, but with this method did not find it necessary, however do think a very low edged griddle would make it easier to transfer the dough to the pan without wrinkling.  I will make the next batch on a two burner pancake griddle to take advantage of the low sides and make two lefses at the same time.  They are smaller than you can buy, but did not find that a problem.

Gluten Free Lefse

3 cups cooked, riced potatoes

3 tablespoons Earth Balance Buttery Spread or organic shortening

1 1/2 cups gluten free flour mix (below)

1 tablespoon sugar

2 teaspoons xanthan gum

1 teaspoon unflavored, unsweetened gelatin

1/2 teaspoon salt

1/4 cup unsweetened almond milk

While potatoes are still warm, mix in margarine or shortening.  Allow to cool to room temperature.

Sift together all dry ingredients (do NOT add almond milk at this time).  Mix dry ingredients into cooled potatoes.  Mix well.  Add almond milk and blend well.

On plastic wrap place a ball of dough about the size of an egg.  Place another piece of plastic wrap over dough and roll out dough into a very thin disk.  Remove top piece of plastic. Using bottom piece of plastic wrap gently put top edge of lefse onto rolling pin.  I used the rolling pin to transfer dough to my pan.  Using rolling pin to carefully lay dough on preheated pan, cook lefse until dry with some brown markings on the dough.  Using a thin metal spatula, flip dough over and cook the other side (the second side will have the classic brown spotting marks when cooked through).

Remove lefse from pan and continue to cook the rest of the dough until all the dough is cooked.

Flour mix used:

about 6 cups

about  12 ½ cups

about 18 ½ cups

Finely ground rice flour

2 ½ cups

5 cups

7 ½ cups

Sorghum flour

1 ½ cups

3 cups

4 ½ cups

Corn starch or arrowroot

½ cup

1 cup

1 ½ cups

Potato starch

¾ cup + 2 T

1 ¾ cups

2 ½ cups

Tapioca flour/starch

¾ cup + 2 T

1 ¾ cups

2 ½ cups

Xanthan gum

1 teaspoon

2 teaspoons

3 teaspoons

Filed Under: Breads, Crackers & Flat Breads, Dairy Free, GFCF, Gluten Free

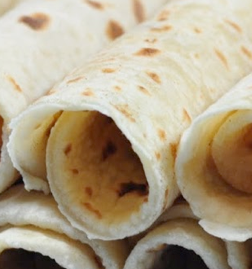
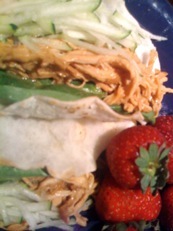
Slow Cooker Moo Shu Chicken & Moo Shu Wrappers

July 24, 2008 by angelaskitchen 2 Comments

I admit, I am a big-time wimpy mama.  I have been loving “Princess Power Week” with the girls, but I am also missing my boy.  Just a few more days and he’ll be back from camp.  I can’t wait!  Of course, none of them will be as CLEAN as they are in the photo.  My son will have to be deloused before being let back in the house.  There can never be enough hot water and soap after getting home from camp!

Last night for supper we had my version of Moo Shu Chicken done in the slow cooker.  I also made wraps (instead of using warmed corn tortillas, which you could also use).  The wraps are an adaption of an Asian-style steamed dumping recipe I have been experimenting with, but rolled very, very thin.  It’s really how amazing how easy this is to work with and how thin you can roll this dough without the benefit of gluten and without xanthan gum.  If you can’t have corn, this would make a nice corn tortilla substitute.  I think I also need to see how it works for egg rolls and wonton wrappers next month.  I would be in heaven!!

Head over to Sandra’s for Slow Cooker Thursday and see what is in everyone else’s crock pot!

Slow Cooker Moo Shu Chicken

I think that chicken thighs would be a better choice, as the texture would hold up nicer and be more “authentic,” however, free range chicken breasts were on sale at my local store, so that is what I used.  If you use thighs, you may need to cook for slightly longer to be able to shred the meat.  This made enough for my family to have leftovers for  lunches (of course, my human garbage disposal is gone for the week…)

1/2 cup gluten free low sodium soy sauce (such as San-J)

2 tablespoons honey

2 tablespoons rice wine vinegar

1 tablespoon sesame oil

2 teaspoons fresh ginger, very finely minced

2 cloves garlic, minced

2 1/2 pounds boneless, skinless chicken breasts

1/4 cup chicken stock or water

2 tablespoons cornstarch or arrowroot powder

6 T thinly sliced green onion

For assembly:

One recipe of Moo Shu Wrappers, cooked

gluten free hoisin sauce or plum sauce, optional

Shredded zucchini, carrots, Napa cabbage, mung bean sprouts or prepackaged veggie slaw

Mix soy sauce, honey, rice wine vinegar, sesame oil, ginger, and garlic in the bottom of your slow cooker (I used a 6 quart).  Place chicken breasts in mixture, stirring to coat chicken breasts on all sides with sauce.  Cover slow cooker and cook for 3 hours on high or 6 hours on low until you are able to shred chicken with a fork.

Remove chicken from slow cooker and shred meat.  Set aside.  Whisk chicken stock and corn starch together.  Add to sauce in slow cooker and mix.  Return shredded chicken meat to slow cooker, add green onion mix well and cover slow cooker.  Cook on high for 1/2 hour until sauce thickens slightly.

To assemble:  On Moo Shu wrapper, spread a small amount on hoisin or plum sauce (optional, to taste), add moo shu chicken, top with veggies of choice , wrap or fold and eat.

Moo Shu Wrappers  (I am not sure how many this makes at this point as the cute little vulture girls were gobbling them down as I was making them.  I had enough for dinner and have about 1/3 of the dough well wrapped in the fridge to cook up today.)

1 cup finely ground rice flour

1/4 cup sweet rice flour

1 1/4 cups water

1/2 – 1 cup tapioca flour/starch

Place rice and sweet rice flour in a pan.  While mixing, add water.  Cook over medium heat, stirring constantly until flour is cooked and very, very sticky.  Remove from heat.  Place sticky dough into a mixing bowl.  Add 1/2 cup tapioca flour to bowl and mix with paddle attachment of your mixer.  Allow dough to cool.  When cool, remix.  If dough is too sticky to handle, sprinkle dough with 2 – 3  tablespoons of tapioca flour at a time and mix (this will depend on the humidity in your area).  When you have a dough you can pull off pieces and not have stick to your hands (think play dough consistency – Yum), it is ready.

Roll slightly smaller than walnut sized pieces of dough, flatten into a disk, place on lightly “floured” (use tapioca flour/starch) plastic wrap, roll out dough with a rolling pin, rotating dough/flipping dough over so that wrap is evenly rolled out, using plastic wrap if needed to help pick up dough.  I made 5 – 6” rounds.

Cook wraps  in a dry skillet until dry and starling to lightly speckle, then flip and cook on the other side.  Place cooked wrap on a plate covered with a clean towel to keep warm while cooking the rest of the wraps.  Or cook, cool, stack, cover well in a ziplock bag and refrigerate until you use.  Warm briefly before filling.

 About this size for the dough…

Look how thin it rolls out!  Whoa!!

Sorry about the photo quality, I was making dinner, rolling dough, and trying to take pictures with my phone, not my camera (which I couldn’t find).  Not the best combo!

4 Comments $manage-tooltip$

Thursday, July 24, 2008 – 12:10 PM
Stephanie
That looks and sounds so good. I love Chinese.. Have a great weekend!

Thursday, July 24, 2008 – 03:16 PM
Sandra
I LOVE chinese and this looks just way too good, I’m saving it and trying it next payday 😉

Thursday, July 24, 2008 – 04:33 PM
Eleisia
Thanks for the recipe and all the details about how to prepare. The Moo Shu Wrapper recipe sounds delicious. I make wonton soup and it would make good wontons.

Thursday, July 24, 2008 – 05:01 PM
Renee’
Sounds great! Thanks for sharing.

Filed Under: Breads, Chicken & Turkey, Crackers & Flat Breads, Dairy Free, GFCF, Gluten Free, Slow Cooker

GFCF Fishy crackers

February 28, 2007 by angelaskitchen 1 Comment

gluten free dairy free goldfish cracker

Let me know how they work out for you!


GFCF Fishy Crackers


Cream together:

1/3 cup shortening

1 T cane juice crystals or sugar

1 t salt


sift together, then add:

¾ cup rice flour

½ cup potato starch

¼ cup tapioca starch

1 ½ T nutritional yeast flakes

1 t baking soda

1 t. xanthan gum

3/4 t paprika

¼ t onion powder

1/8 t garlic powder


Mix in:

¼ cup water

1 T cider vinegar


The dough should come together nicely into a ball in your mixer at this point.  Pat or roll out about 1/8” and cut into desired shape.  Use a very thin metal spatula to slide under the dough and move the crackers to baking sheet.  Bake at 375 for 8-10 min.  Remove from pan and cool on cooling rack.  Munch.

Filed Under: Breads, Crackers & Flat Breads, Dairy Free, GFCF, Gluten Free

Primary Sidebar

Recipes are all Gluten, Wheat and Dairy Free!
Have other dietary needs? Try these:

Welcome to my kitchen!

Subscribe2


Archives

Want to read more? Cookbooks available from Angela’s Kitchen:

Angela’s Kitchen contains affiliate links throughout the site. If you choose to purchase items or services through these links, I will earn a small commission at no extra cost to you.  Angela’s Kitchen is also a participant in the Amazon Services LLC Associates Program, an affiliate program designed to provide a means for us to earn fees by linking to Amazon.com and affiliated sites.

These programs help reduce the costs of running this site. THANK YOU in advance for any clicks through!

Discover a whole new world of gluten free living!

CeliacDisease.org

CookEatShare Member
view my recipes
CookEatShare Member

Footer

I am so happy when someone tries one of my recipes. I do ask, though, that you link back to the recipe instead of posting it on your site unless you have made major changes. I have big plans for some of my recipes. Please remember, recipes are for personal use only. I do NOT give permission for any recipe, article, photo, etc. partially or in whole from angelaskitchen.com to be used for profit on another site, in published medium of any kind, or to be copied in part or whole. You MUST contact me for permission if you would like to use a recipe on a paid/membership website, in a restaurant, store, bakery, etc. for profit even with your adaption (this includes any “clubs”, membership sites, etc. that repackage other bloggers work for a fee, even if the original had been adapted or put into another form). THANK YOU FOR UNDERSTANDING. 🙂

Member, Association of Food Bloggers

Copyright © 2021 · Foodie Pro & The Genesis Framework

7ads6x98y